I and 64,999 other people decided to go for a bit of a cycle around London on Saturday! Going by numbers alone, the Skyride seemed to be a success. The roads were indeed carless, priority was given to cyclists and the weather was good; all important factors when enjoying a ride. The only downside that I encountered was the amount of cyclists! There are a lot of people that should not cycle on the roads unless there are no cars and it is heavily marshalled; maybe these people would be good road racers?! There were some seriously unroadworthy offerings. One gentleman I saw had a rear wheel so heavily pringled that it was barely going through the frame. I felt most sorry for the bike doctor, that chap could not have imagined what was going to happen! In fairness he did seem to repairing approximately 14 different Apollo bikes at any one time; and I went past him a few times!
There was a good Brompton turnout, plenty of 2009 models. I'd not seen that many of the available colours in the 2009 matt finish, so it was nice to see some of the rarer colours (purple haze, cornflower blue, turkish blue, orange, baby pink and desert sand). I think the fact people are willing to spend an extra £25 or £50 just to make their Brompton individual speaks volumes about Brompton owners. Some people are not that fussed about what colour their bike is (or how useful it is: see Apollo), but Bromptoning is a way of life! I'm still yet to see a raw laquer Brompton up close; from the photos I think it may be my favourite finish along with cornflower blue. Maybe my next Brompton will be one of these colours. Seriously considering another Brompton, no I don't need one, but I really really want one!
Anyway back to Skyride, I would definitely do it again. I think it shows the amount of people that would be willing to cycle if the roads/cycle paths were safer. I also wonder if there are a finite number of people who should cycle in order to keep the number of road incidents down...
Thursday, 24 September 2009
Brompton Related Luggage!
I've never been one to like panniers and baskets and alike, but the time finally came for me to bite the bullet and let the bike do the heavy lifting. I usually use a Crumpler Weenie to carry all of my belongings and I must say it has worked excellently for over a year; but it's just not big enough. With the wetter weather due any day now I like to be able to carry the waterproofs just in case. Now, there are plenty of options out there depending on type of Brompton, type of load and fashionable leanings; but I purely wanted to be able to carry a flexable sometimes large load. I looked at the Carradice range of bags and I was very close to purchasing the City Folder, mainly due to its classic looks coupled with modern twists (leather buckled straps conceal quicker to use plastic clips), but it just didn't quite cut it on the volume stakes. I also considered the C-Bag and the older S-Bag, but I think these are more for the laptop carrying Brompton user. I've made it pretty obvious, but I purchased the front Touring Pannier and I love it. There are a two different configurations of the bag available with frame or without and its worthing making sure which version you're getting if you're buying online.
I intended on purchasing online, then I found out that Velorution (http://www.velorution.biz/) do a price match ("Don't feed Cowboys and Chicken") with any UK or European retailer, online or bricks and mortar and it just so happened I was going to be passing the following day! Bonanza! I went in and sure enough they had it and, I didn't even need to use the price match as it happened the price on the website was out of date and they were selling at the same price as online retailers.
I thought the Touring Pannier would excel in the cold/wet weather but it also has its upsides in the warm weather (as I expect, does the other luggage); these mainly revolve around not having something clinging to you making you sweat more! Also it means, if you go for a cycle in the chilly morning, you have somewhere to stuff the jumper come sunrise! I have nothing but praise for the front pannier, there is only one downside which I have found so far and that is the slightly slower fold time, as you have to remove the luggage pre-fold. I have found that you can re attached the bag once folded (though stability is seriously compromised with uneven or heavy loads) and push the Brompton around shops. I also usually carry my Brompton, unfolded, down steps etc and obviously (I say obviously but the first time I went to pick my bike up with the luggage attached I managed to make a complete hash of it) now I have to grab the frame a touch nearer the headtube. The stuff pockets at the front and sides are good for drinks and maps. The clippable pockets at the rear are good for more frequently used items and also smaller things that would get lost in the 28 litre capacity of the main pocket! The clips for the main luggage hold seemed to be in a bit of an odd place to me, semi submerged inside the side pockets. It works, don't get me wrong, but it took me a minute to find them first go! I was also happy to find a rain coat for my bag tucked inside the divided internal pocket, so should it rain, everything should stay dry. I'm officially converted into a pannier user and I can't see myself going back...
Improved breaking (sic)?
For a while now my standard brommie brake levers have been accruing a type of unsettling wobble. Today I decided enough was enough and it's time for a change; so after some severe rummaging in my box of cycling spares, I found a pair of Avid SD5 levers. Incidentally the Avid SD5's are used on the unfathomly expensive (but in a way, very good looking) Birdy Hybrid Folding Electric Bike (see: http://www.cyclesense.co.uk/products.php?plid=m23b282s19p7631&rs=gb). Anyway, I digress; after some foraging on the internet I found no method for removing the current Brompton levers, so I got the tool box out and decided to do the leg work myself. And here's how it went (any queries then leave me a message):
Figure 1. How to release the lever from the bars
The bolt to release the Brompton brake levers from the handlebars is actually inside the lever itself. You have to squeeze the lever and slip a 4mm allen key in through the gap where the brake cable sits (see: Figure 1).
It's worth noting here that the barrel adjuster on the Brompton lever is different to "normal" levers. Normal levers have a split in them to allow the cable to be removed without having to undo the cable at the opposite end and pull it through...(See: Figure 2)
Figure 2. The unusual Brompton barrel adjuster
So, you have to undo the bolt which holds the brake cable to the brake caliper allowing the brake cable to be removed all the way through the barrel adjuster. You may also have to snip off the cable cap on the end of the cable. If you have to do this, ensure you are going to have enough cable left to setup your brakes when it comes to putting everything back together.
Thread the cable through the cable outer, making sure that all frame mounted routings are used and that the cable follows the same path as previously. If you take a new route, it may affect the fold. It's also worth squirting a dash of GT-85 down the cable outers just to keep the action smooth and to displace any trapped water.
Feed the brake cable onto the lever and ensure that all of the cable outers are seated into their fittings.
Re bolt the cable to the brake caliper and squeeze on a cable cap.
Now all you have to do is make sure that the brake pads are sat equidistant from the rim on each side. If not, lightly loosen the bolt which holds the caliper onto the frame and adjust the pads accordingly. Make sure you hold the caliper when tightening, else it'll just spin back to how it was!
So that's it, the only concern I have now is that somehow due to the increased power that something will give up and snap off. I have never had an issue with Brompton brakes previously and I think the calipers work excellently. This was not an adjustment due to necessity! Here's the finished article:
The image doesn't really do it justice, the levers do look remarkably fitting, with the added bonus that the brakes have become binary brakes!
If you follow my instructions, do so at your own peril, I can't be held responsible if anything bad happens!
Standard Brompton Tyres...
There are mixed views in the world of the Bromptonaut about how useful the standard Brompton tyres ("yellows" due to the yellow label) actually are. Now I've had these on my Brompton for the duration of its life; which is well over a year now and I have only had one puncture in the rear tyre (frantically touching wood...). I ride through the mean streets of London on a regular basis, I do however do my best to dodge the glass and other unknowns in the road, I've only ever hit one pothole (read: crevasse) and that did more damage to my wrists than the tyres. I've had several near misses with cars, pedestrians and other mammals, requiring me to drop the anchors at short notice and come to a sliding stop. There is still a decent depth of tread and I am only just considering changing them to something else due to some slight cracks appearing. They've held up reasonably well in the wet, I never usually venture onto the road paint unless it's suitably warm and I do my best to avoid the ironworks; especially in the wet. So my view is that they are a totally acceptable tyre (I'm sure they wouldn't get through the Brompton QC if they weren't), but as with most things common sense is necessary. The big question now is which tyres do I get next...!
Light the way, hassle free...
Soon, it'll be the time of year when lights will be needed again. Sorry to be the bringer of doom, but it's best to be prepared! I think I have the best lights for a Brompton, bar the official Brompton ones (though I would still tandem these with some auxiliary lights), the Topeak ComboLite lights. Now these don't seem much to look at but I can assure they do the trick. First off, they are cheap, admittedly not always a good start, but in this case I think it is. They are small, require no permanent fixings, batteries seem to last forever (manufacturers state 60 hours use on constant, but I'm sure mine have lasted longer than this), multiple functions and they weigh next to nothing. I think the best feature of these lights is the fact they can stay on the Brompton when folded. I'm a forgetful type and one of the things I always forget is lights, plus if you go riding during the day and end up staying out until the darker hours and you haven't remembered your lights you become one of those plums who ride in the dark without lights...Bonnet fodder. So I leave mine on, they've been on all summer, I've not used them but there they are, just incase! Another plus is that I use my rear light as a stopper to prevent the extended seat post from hitting the road when I fold. It's only a small thing but it helps speed up the folding process. Now I have got the rear light teamed up with a Cateye TL-LD170 as I was going through a period of severe invisibility but I think for the average rider the Topeak Combolites would suffice. Also worth noting is that SJS-Cycles sell these as well as lots of other Brompton goodies...Go on, treat yourself and don't get run over!
Upgrade those transit wheels!
Shortly after I got my Brompton one of my transit wheels (read: wobbly little black cone) decided to split. I'm not entirely sure how this happened, but it did, so I decided to get some new ones! I did some research from others who updgraded theirs with various things from rollerblade wheels to the official Brompton "Eazy Wheels". I was tempted by the "Eazy Wheels" initially as they seemed to offer me a more robust solution, but then I also liked the idea of rollerblade wheels; as I guessed rollerblade wheels would be able to take a lot more stick. I read further into the idea of adding rollerblade wheels and what modifications would be needed and all it seemed to be was a shim for the wheel and a long enough bolt to attach. The only downside as far as I can see is the severe ankle damage which can occur when your bone meets the metal at speed! The Brompton is a carefully designed piece of engineering, so boshing some big wheels on is going to cause some issues. Plus they have a tendancy to look ridiculous. So that idea was ditched. Then I found these on ebay:
Now these seemed to tick all of the boxes. So I bought them. I can honestly say that these are brilliant in comparison to the cones that were fitted previously. They fit in about 5 minutes, with no problems at all, as long as your capable of turning a screwdriver. There are a number of washers in the pack so that you can space the wheels exactly how you like. I have mine spaced as wide as they can go as I travel frequently on trains with my Brompton so I require the extra stability. When I'm in a supermarket I like to push my Brompton around with my foot (a gentle push on the rubber stopper) and it does this very smoothly. The inevitable dirt is simply removed with a damp cloth and they suffer minimal wear if cared for; mine still have the fine grooves from production.
I thoroughly recommend these wheels if you, like I, are looking for something robust, smooth and reliable. They are only available from a chap called hans630_2 on ebay usually under the item heading of "Brompton solid light weight solid polyurethane transit wheels". I have no affiliation with this user and I am purely recommending the wheels from my experience.
Arkon PDA Holder...
Now, I like a ride through uncharted territory as much as the next Brompton rider, but getting frustrated by getting lost can spoil this for me. So as something of a gadget lover I thought I would double my PDA up as my cycling sat nav. I have (read: had, I'll get to this in a minute) a Dopod 818 Pro, with TomTom 6 loaded and ready to roll. This is (was) a tidy little PDA and I'd used it as a sat nav in my car (this was when I realised it also planned routes for bikes!). So I punched my destination in a (20 mile jaunt through London) and off I went.
Now, when I pushed the PDA in I wasn't astounded by the security that it seemed to be offering. Yes, there are little foamy patches which stop any little scratches and allow for a squeeze fit, but there was a certain amount of play. I made it about 3 miles when I was directed through Rotherhithe tunnel. I wasn't that impressed with the idea, but I went with it anyway. I decided to trundle along the pathway, as the road is narrow and I didn't fancy a duel with my new kit onboard. I remember thinking this is a fairly rough piece of tarmac I'm currently travelling on, then "Ping". It was gone. My PDA had departed from the holder and decided to try and end it all. I managed to recover the PDA, and most of its constituent parts, from the side of the road. Bar a few scratches and grazes it was ok. I powered back up and went on my way, pretty annoyed, but determined to go for a pleasant ride.
The aforementioned "Ping" happened twice more during my trip. Once I noticed and again rescued the unit, but the second time I looked down and it was gone. By this time I was pretty hacked off with the whole arrangement! I retraced my steps and the first part I found was a battered battery cover. Now it took me a good 15 minutes to recover the rest of my PDA from the middle of a busy box junction. It had been run over by what could only have been an articulated lorry. It was smashed. Destroyed. Finito. And to think I was worried about the little scratches earlier in the day.
Now, the design is good as far as the handlebar mount goes. But the actual phone grip requires serious work. I'm considering getting an iphone or similar smartphone and all these phones have built in sat nav, but would I attach it to an Arkon holder? Only if I felt certain I could afford a replacement…
If you are going to get one of these, don’t. Get a holder where there are clips involved, don’t trust expensive bits of kit to little bits of foam…I think next time I’ll stick to the “A to Z” chartered territory.
Brooks B17 Champion Special Men's Saddle...Comfort or Calluses?
Right, let's not beat about the bush here; these are expensive saddles. I used a standard Brompton saddle for about 6 months (the original foam saddle on pre 2009 models, not the new saddle with the hand grip on the nose). I thought this was a relatively comfortable affair, I did tend to "bottom out" (pardon the pun) onto the plastic pan over the larger bumps, but nothing too bad. There was some peeling on the nose of the saddle though, where I was carrying the bike around; so I thought it time for change.
I have tried several different saddles over the years on a variety of mountain bikes, but I've not sat on leather. It's always been "gel" and "ultimate comfort" and other such buzz words. So owning a Brooks saddle required a certain amount of trust after reading about the 200 mile bedding in period. I was concerned that I would be walking around the office like John Wayne but alas, the worry was unfounded, well...partially. The first approximately 20 miles were fine, nothing to report, no chaffing no obvious signs of danger. The next 80 were a little bit uncomfortable! (It's worth noting here that my frame is somewhat, aerodynamic, thus built in padding is minimal!) It wasn't really bad it was just a small battle of supremacy between the buttocks and the saddle. Eventually the moulding started to take place and I can happily say now that it is probably the most comfortable saddle I have ever owned.
I was slightly pre-emptive about carrying my Brompton around by the saddle as I was unsure of the consequences, after the peeling that had occurred to the previous offering, I definitely didn't want anything like this to happen again. So after struggling to carry my load using the frame, I just decided to just go for it. I've been carrying it around using the saddle for approximately 7 months now (general moving the bike about, including stairs at stations etc) and there is no damage at all.
As far as general saddle upkeep goes, I have applied one coating of proofide (coating applied with a duster, left to go cloudy and penetrate the leather, then remove with said duster and give a bit of a buff) and nothing more. I've not had any sagging, so there has been no need to touch the tensioning screw; he has pretty much looked after himself.
I thoroughly recommend this saddle if you do the mileage and are looking for a long term bottom investment. You may have to put up with people questioning your sanity (a tap of the knuckle on the saddle makes it sound anything but comfortable), but they don't know what they're missing, just let out a manly noise, safe in the knowledge you'll have a comfortable ride home...If it's bedded in of course!
Current Brompton Setup
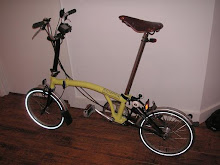
The photo below shows the current setup of my Brompton M3L, there are modifications from standard, Brooks saddle, Arkon bike PDA holder, Topeak white lite/red lite combo set and solid polyurethane transit wheels.
I will shortly be reviewing these modifications.
Subscribe to:
Posts (Atom)